
I finally got my studio made over and it is functional! Many of you may remember these pictures from This Post:

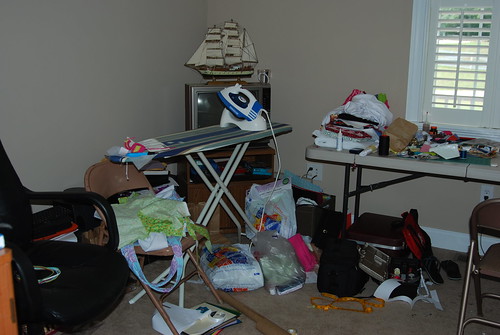
It was a mess of unholy proportions. It was to the point that it was losing it's functionality because it was such a disorganized mess. I looked at a lot of pictures of different studios online, got insanely jealous, and decided to do something. Unlike a lot of the studios online, though, this space is not only a studio. It's our "office" too with the computer and such. And on top of that, if things go according to plan, will be a nursery in a year's time or so. So I couldn't install a beautiful wall of shelves. Or custom track lighting. Or custom work bench/counter tops. Plus, I had a budget. So after a trip to Fred's, (if you don't have a Fred's in your area, it's like a small town Wal-Mart) about $30, and some serious cleaning and organizing, I present you with my new studio!

Ok, I will admit that there is still a bit if a mess on the table top. But I'm in the middle of a wholesale order, and it is organized chaos. But I got rid of the pile of fabric and got a little magnetic dry erase board (about $4) so I'll know what projects I'm working on. It's also helpful for math. And Hubs did bring home some custom lighting for me! A friend gave him a 100 watt halogen desk lamp with a swiveling head and extendable arm! Things that people just don't want anymore are great. In the meantime, college desk lamp is hanging out under the table until I can find a good use for him.

So the Gorch Fock is still there. That belongs to Hubs and there's nowhere else to put it, so it can stay. But I got rid of that pile of scrapbook paper and shopping bags lurking under the ironing board. The duffel bag (or what I've started) is still hanging out on the chair, but oh well.

I cleaned my junk off the desk, most of it shipping info and created a shipping center to the right. I'll write more about that on the bottom picture.

This is my crowning glory of this project. I spent about $5 each on the shorter hanging organizers (and Hubs had the middle one) and I put my fabric, notions and yarn in those. Everything is organized by type. Smaller stuff up top, all my interfacing together, odd certain projects put together...All my scrapbook stuff is in the middle hanger. That was a project that had spilled into the guest bedroom. And the beauty of this, is that when I get ready to move it, I just move it. No rearranging and packing!
I also made a ribbon hanger. It's not very stable, but it gets the job done. It's made from a dowel rod cut in half (about $1 if not less, I can't remember because I bought it for something else a long time ago and never used it) and a piece of ribbon that says "Nuestra Boda." Since no one in my family speaks Spanish, I don't think I'll ever be using that ribbon scrap.

I got these little stacking shelves for about $5 each. They give me some more tabletop space where I can put notions that I use all the time. The neon buckets came three to a pack for just $1 at the Dollar General. I got three packs in the color that I use on my business cards. How convenient! I also bought the little jewelry organizer at Michael's for about $2 for my elastic, snaps, keyrings and so on. It has made all the difference. And yes, I do use a lighter on my work. A lot cheaper and easier than Fray Check on satin ribbon.

Here's a better view of the buckets and what I have in them.

And here's my shipping center. I found my old Yaffa blocks in the basement from college (I think when I bought them about 7 years ago they were only $15-$20) and cleaned them off. I've got a few boxes, my bubble mailers, cello bags, stickers, string and scales all in one place, right by the computer for printing out shipping. I used more of those neon buckets to hold business cards. You can't see it, but I got a poly folder for all the business cards that I recieve from different sellers too. Some of those things have coupons on them!
So it's not as shiny and girly as some of the studios on the internet. The walls are still plain, they don't have inspirational quotes pasted on in vinyl. And a lot of the stuff is repurposed in here. But it's functional and organized and most importantly CHEAP! So many of us don't have the luxury of being able to spend what we want on our hobby or even business. But with a little ingenuity, and some old college storage stuff, I now have something that I would be proud to bring someone in. It's a start. I'll keep dreaming about that shiny studio that I'll have one day.
Do you have any tips that you would like to share about studio organization?
Great job!! I just re-did mine too! I am posting about it on Friday, but I think your area looks fantastic!! :) I think its all about what works for you, ya know? There are some pics that I see of crafting areas where I am like, "wow!" but I also know that it would not work for me. :)
ReplyDeleteI found your blog by a comment on the crafty CPA. Great job on your space. I like how you store your ribbon and fabric. I haven't finished my space yet, but I have collected lots of inspiration photos on my pinterest board
ReplyDeletehttp://re.pn/b/zH1I